Misunderstanding door jamb vs casing specifications in a manufacturing RFQ leads to factories shipping incorrect components and stalls commercial installations. The same error makes installers measure the wrong structural element and inflates project overhead.
This guide benchmarks frame components against finish carpentry standards, from jamb depth matching to casing reveal tolerances, so you can specify a precise, smoothly operating opening.
The Door Frame and What It Actually Carries
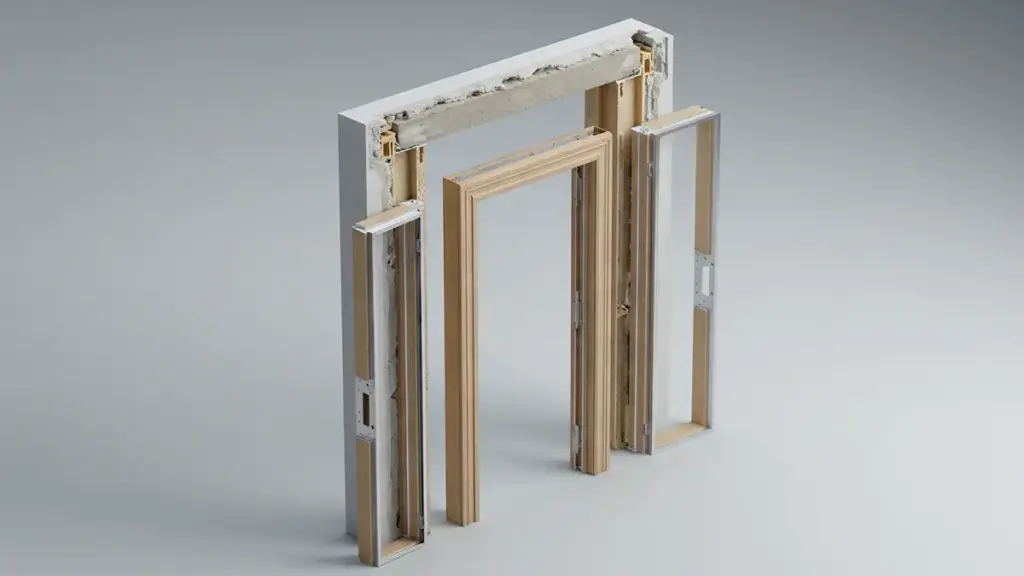
The door frame is the complete assembly bridging the wall opening and the moving slab: it defines alignment, receives hardware, and seals the perimeter. It supports the door, not the building.
Rough Opening and Wall Integration
Before a door hangs, the structural envelope around the opening must be understood. Wall loads above the opening rest entirely on the horizontal header, supported by king studs and shorter jack studs. The door jamb carries the weight of the door—it does not support structural wall weight.
- Rough Opening Clearance: Standard framing leaves a rough opening typically 1-1/4 에게 2 inches wider and taller than the nominal door size, creating room for positioning, leveling, and shimming.
- Jamb Depth Matching: Frame depths must match the complete finished wall thickness, including studs and drywall layers. Typical interior depths measure 4-9/16 inches for 2×4 framing and 6-9/16 inches for 2×6 프레이밍. Our interior door thickness guide covers how wall build-up and door thickness drive jamb depth in procurement.
For RFQ purposes, state the finished wall build-up rather than the nominal stud size. A frame sized to the stud will sit proud or recessed once the drywall goes up.
Core Components of the Frame
Each component must match the depth of the finished wall; mismatches leave the jamb recessed or proud, which immediately disrupts casing installation and hardware alignment.
- Side jambs and head jamb: The vertical legs (hinge and strike sides) manage the weight of the slab and hardware engagement, while the head jamb closes and aligns the top of the frame.
- 창틀, 한계점, and door stop: Sills and thresholds seal the bottom transition on exterior openings, while stops—applied strips or milled rebate shoulders—are the surfaces the door closes against. Interior units typically omit sills; exterior assemblies require integrated thresholds, 스윕, 섬광, and moisture-tight sealants.
- Casing versus structural framing: Casing is cosmetic trim that masks the rough wall-to-jamb gap. The wall studs and headers carry the structural load, not the trim.
How the Frame Performs in Service
A correctly installed frame routes the dynamic forces of a swinging door into the structural framing of the wall; minor alignment errors yield immediate operational failure. Fasteners must drive through the jamb into the wall studs—pinning only to drywall leads to shifting, 열분해, and loose joints over time—and proper shimming behind hinge and strike locations keeps the jamb from bowing under stress. Without both, the door eventually sags, rubs the frame, or fails to latch.
The Operating Parts Around the Frame
Beyond the frame itself, operation depends on slab construction, hardware alignment, and installation sequence.
- Slab anatomy: A standard panel door slab consists of vertical side stiles and horizontal rails that frame the interior panel inserts or glazing lites.
- Hardware mounting: Heavy hinges transfer the slab weight to the hinge jamb. The latch bolt must engage the strike plate cleanly without dragging, which requires a plumb jamb to prevent binding.
- Prehung versus slab replacement: Prehung systems provide a factory-machined jamb, stop, and slab package that cuts installation time. Slab replacements require hand-cutting hinge mortises and beveling edges to fit existing, non-standard frames.
- Installation sequence: Installers plumb the hinge jamb first, level the head jamb, then secure the strike side, checking squareness across the diagonals. Skipping this step results in binding, latch failure, and premature hinge wear.
Jamb vs Stop vs Head
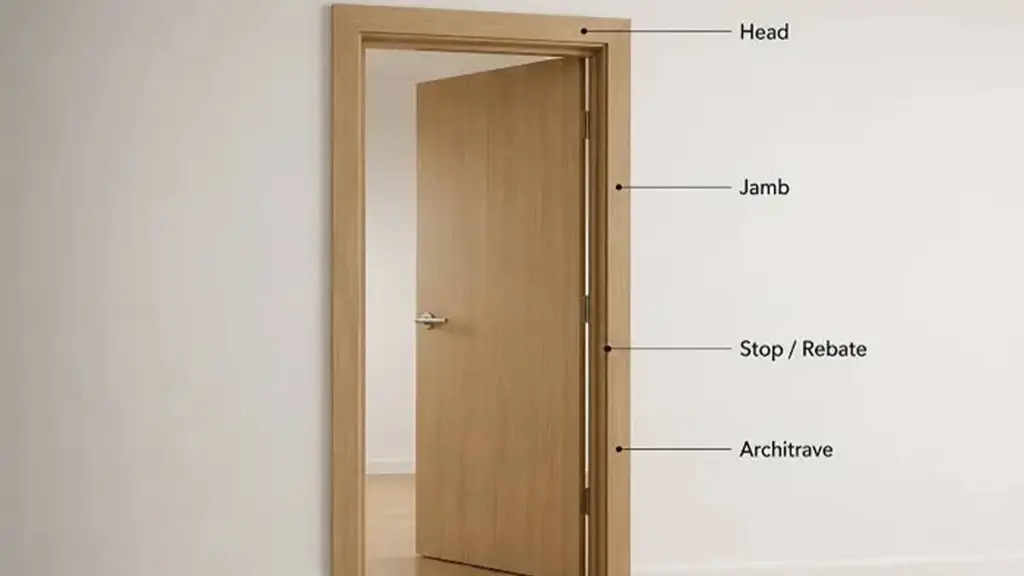
A door frame relies on jambs and a head to position and support the door, while stops establish the closing point. Decorative casing only hides the wall gap.
Structural Roles and Physical Relationships
Vertical jambs carry the door leaf and hold the hinge and latch hardware. The head jamb—the horizontal top member—closes the opening and keeps the frame square. Both are functional frame members: they position the door and receive hardware.
Door stops attach to the inside faces of the jamb and head; they physically block the door leaf from swinging straight through the frame. Stops come in two profiles. Applied stop strips are separate pieces nailed in place, allowing on-site adjustment; rebated (rabbeted) frames mill a stepped shoulder directly into the jamb for a cleaner finish and better sealing. Exterior entries typically use jambs with integral stops that seal out drafts, while interior setups rely on applied strips.
Casing sits outside all of this. It is cosmetic trim nailed around the frame perimeter to hide the gap between the jamb and the drywall—no hardware mounts to it, and no door weight rests on it.
Common Confusions Worth Unlearning
People often confuse the visible head jamb with the structural wall header. The head jamb is just the top finish piece of the door frame. The actual header is a heavy, load-bearing wood or steel beam hidden inside the wall above the rough opening.
Another mix-up involves the frame stop versus a doorstop. The frame stop is the strip inside the jamb that the door closes against. Hardware doorstops are the springy metal or rubber bumpers anchored to floors or baseboards to keep the door handle from damaging drywall. 비슷하게, “손질” is often used as a catch-all for anything cut around an opening; in a specification it is not a synonym for jamb, head, or casing—suppliers price each differently.

포장, Apron, and Trim
포장, apron, and brickmould hide the raw gap between the wall and the frame. Material choice and a consistent reveal determine how well the finished opening wears.
What Each Piece Is Called
Field crews still confuse the structural jamb with decorative trim. The jamb forms the functional frame inside the rough opening, supporting the hinges, strike, and slab; casing sits flat on the wall surface to conceal the raw construction gap. With layered headers or transoms, installers add a horizontal apron below a projecting head casing to bridge the transition to the wall.
Setting the casing requires a deliberate setback from the jamb face—the reveal—kept consistent on all three sides of the opening so the trim stays clear of the hinges. 우리의 알루미늄 도어 하드웨어 선택 가이드 details the hinge, strike, and closer preparations that sit around that reveal.
Material Choices and Their Trade-offs
Material selection directly impacts paint quality, moisture behavior, and long-term dimensional stability:
- 단단한 나무: Takes a crisp profile for stained finishes, though humidity changes can cause the wood to warp or split.
- Finger-Jointed Pine: A cost-effective, factory-primed option for painted finishes, with greater dimensional stability than solid wood.
- Paint-Grade MDF: Delivers a smooth, knot-free surface at a low cost, but it swells and degrades rapidly if exposed to standing water or persistent high humidity.
- Moisture-Resistant PVC: Waterproof and rot-proof, making it the default choice for exterior brickmould and high-moisture commercial spaces, though it expands and contracts along its length with temperature swings.
Style Profiles and Proportion
The visual character of the opening depends on the assembly method. Traditional mitered trim joins profiles at 45-degree corners. Flat-stock butted joints skip the miters, resting the head casing on top of the side casings—a staple of modern and Craftsman designs, where a wider head casing, thin apron, and projecting cap complete the look. Rosette-and-plinth assemblies use decorative corner blocks and heavy bottom plinths to eliminate miters entirely.
Proportion matters as much as profile: taller doors and 10-foot ceilings typically call for wider 3-1/2 inch casing, while standard 8-foot openings look balanced with 2-1/4 inch trim. Align door casing with adjacent window profiles, and resolve thick-baseboard-to-thin-casing transitions with plinth blocks or self-returns.
How Casing Should Be Fastened
Loose casing is almost always the result of nailing into drywall. Fasteners must bite into solid framing: the inner edge of the casing is secured to the jamb and the outer edge to the wall studs, typically with 16- or 18-gauge pneumatic finish nails spaced every 12 에게 16 신장.
Reveal and Operating Clearances
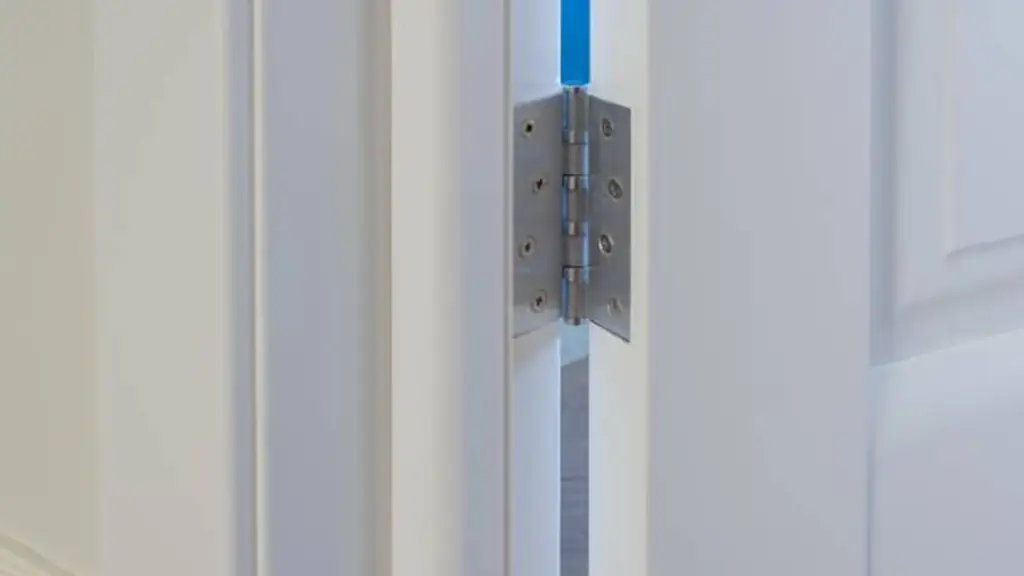
Precise casing reveals and door-leaf clearances prevent binding and hardware interference while establishing clean, professional sightlines.
The Reveal, Piece by Piece
The reveal is the deliberate setback between the jamb face and the casing. 일반적인 레이아웃에는 다음이 포함됩니다.:
- 1/8-Inch Reveal: A narrow, crisp shadow line that requires accurate jamb-to-wall alignment to hold.
- 3/16-Inch Reveal: The common practical standard; balances clean lines with enough tolerance to hide minor material variations.
- 1/4-Inch Reveal: A pronounced, traditional border that tracks more easily over irregular walls.
Two special cases deserve their own line items. 포켓도어 require a consistent 1/8- to 3/16-inch reveal on split jambs to keep the slab centered; 우리의 pocket door hardware explainer covers the tracks, 롤러, and guides behind that dimension. Fire-rated assemblies are the exception to every field rule: installers adhere strictly to the tested manufacturer listings, because modifying frame faces or margins in the field can void the fire rating.
Operating Clearances and Quick Diagnosis
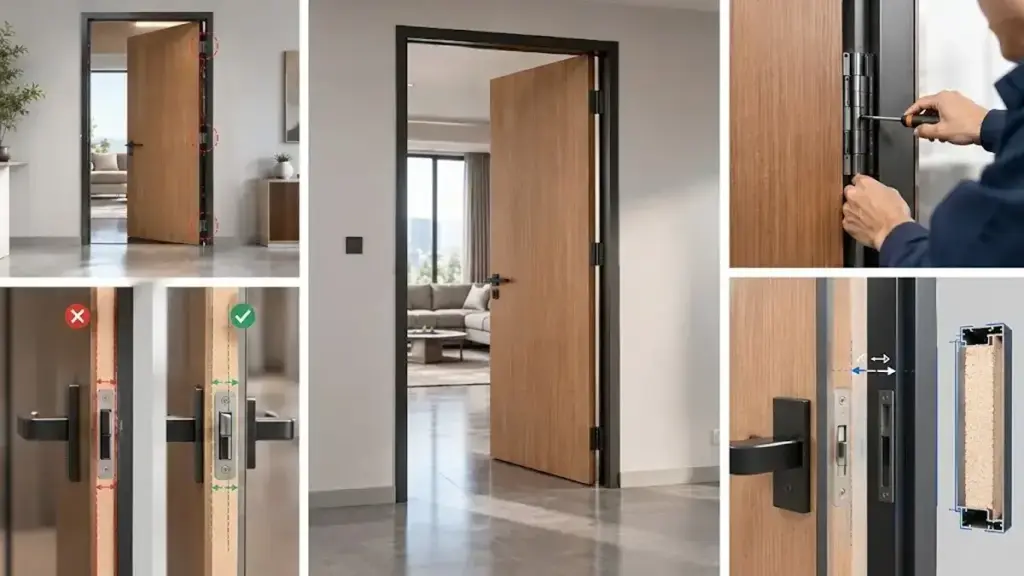
Operating clearances keep the leaf opening, 앞뒤로 흔들리는, and latching without friction. A sound installation targets a consistent 1/8-inch gap at the head and both sides, ~와 함께 1/2 에게 3/4 inch at the bottom for ventilation return air and floor coverings. Keep casing edges at least 1/4 inch back from the hinge pivot line so thick trim does not foul the swing, and set the strike plate fully on the flat jamb face, clear of the casing edge.
When a door binds or the latch drags, the fault usually traces to installation geometry:
- Hinge bind: The door springs open or resists closing—typically hinge cups mortised too deep or screws sitting proud.
- Latch friction: The bolt drags on the strike lip—often a sagging strike jamb or loose hinge pins letting the leaf drop.
- Uneven head margin: A wedge-shaped gap across the top indicates an out-of-plumb hinge jamb or a sagged structural header.
Field corrections start with the cheapest fix: tighten all hinge screws, or swap standard screws for three-inch fasteners driven into the framing studs to pull the jamb plumb. Cut the leaf only after the frame is confirmed square.
알루미늄 문 Change the Rules
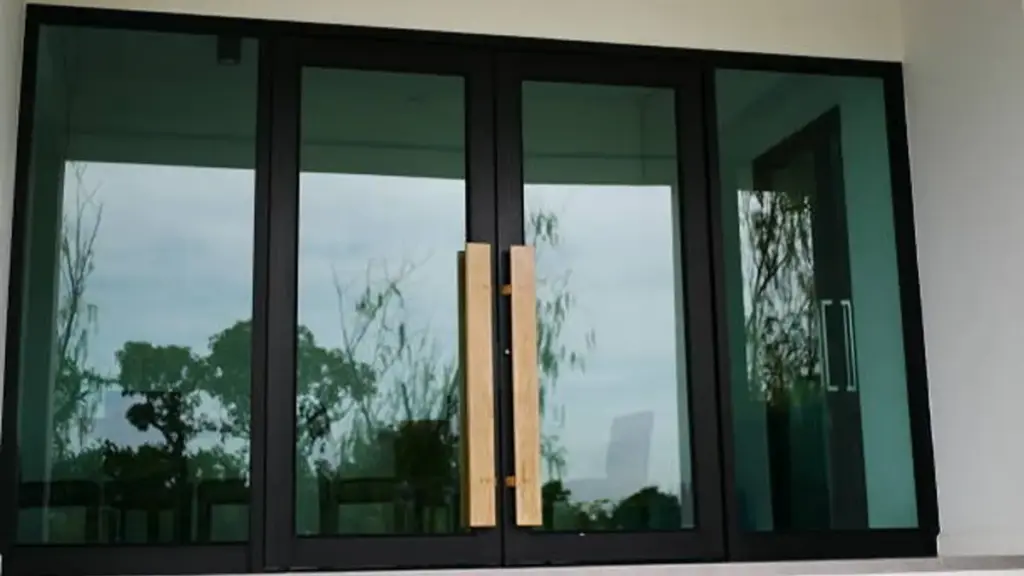
Aluminum door frames bypass the wrapping mechanics of traditional wood casings, shifting the burden from trim tolerance to precise rough-opening and surface-aligned interfaces.
Surface-Oriented Framing and Integrated Extrusions
Traditional wood frames wrap around the wall to hide drywall edges; aluminum systems butt directly against a precisely prepared opening, so wide casings can no longer hide rough framing errors and the opening must be square from day one.
The stiffness of aluminum allows manufacturers to extrude multi-functional profiles that build several elements directly into the frame face:
- Glazing pockets: Channels that secure glass panels without separate stop molding.
- Weather-seal channels: Grooves designed to house compression gaskets.
- Hardware channels: Built-in reinforcement zones for heavy-duty pivots and closers.
Minimalist Trim Alternatives
When trim is specified on aluminum systems, it is often applied without nails—installers secure the frame first, then snap covers over the joint line, concealing fasteners entirely. Common details architects specify:
- Snap-on casings: Metal clips or tracks lock aluminum trim over joint lines.
- Shadow-gap reveals: A controlled recess between the drywall edge and the extrusion.
- Flush returns: Plaster or drywall terminates directly against the frame face.
Correct Terminology for an RFQ
Vague RFQ specs delay commercial projects and inflate bids. Use precise terms to separate structural frame components from decorative finish trim.
Suppliers price exactly what you write, not what you intend. If you request generic “door trim” when you actually require the structural frame, you face change orders on site. Isolate each component in your procurement documents.
| Term | 주요 기능 | Structural Role |
|---|---|---|
| 문틀 | Complete supporting assembly surrounding the opening. | 기능적 (supports the door, not the building) |
| Door Jamb | Individual vertical or head members of the frame. | 기능적 (supports hinges, receives latch) |
| 포장 | Decorative molding covering the wall-to-frame gap. | Non-structural / Finish trim |
Structuring Specifications and Line Items
To prevent bidding errors and ensure complete pricing, break the opening down into explicit deliverables:
- 문틀: 사용 “door frame” for the complete supporting assembly, which contains the side jambs, head, and sill components.
- Door Jamb: Identify the “door jamb” specifically as an individual vertical or head member of the frame.
- 포장: Define “casing” as the non-structural decorative molding applied around the frame to cover the wall-to-frame gap.
- Brickmould: Specify “brickmould” instead of casing for exterior trim applications that seal the outer wall cladding transition.
- Separate Casing and Frame: List the structural frame and the decorative casing as distinct line items so suppliers cannot assume one includes the other.
- Jamb Depth Dimensions: State finished wall dimensions and required jamb depths in the RFQ instead of relying on nominal stud sizes.
- Hardware and Sealing: List hinge counts, strike preparations, closer reinforcement, 날씨를 쫓는, threshold sills, and installation labor responsibilities directly within the line-item breakdown.
From Approved Terminology to Shipment
Terminology only pays off when it survives into production. The sequence below keeps a specification frozen from quotation to delivery, so inspection compares against the same baseline the bidder priced:
| 단계 | What You Lock Down | 중요한 이유 |
|---|---|---|
| 1. RFQ and sampling | Separated line items: 액자, 잼, 정류장, casing, hardware prep. | Bids compare like-for-like; exclusions surface before award, not after. |
| 2. Sample approval | A signed physical jamb-and-casing sample with reveal and depth verified. | A tangible baseline for every later dispute; drawings alone leave room for interpretation. |
| 3. Specification freeze | Finished wall dimensions, jamb depths, hardware preps, 완료, and packaging confirmed in writing. | Change orders after freeze are the main driver of delayed commercial shipments. |
| 4. Pre-shipment inspection | Verification against the frozen spec and the approved sample, including sampling checks agreed in advance. | Catches depth and reveal drift at the factory, where correcting is cheap. |
| 5. Delivery and after-sales | Documentation trail: approved sample, frozen spec, inspection record. | Resolves site claims quickly and protects reorder conversations. |
자주 묻는 질문
What is the difference between a door jamb and a door casing?
A door jamb is the functional frame member that carries the door leaf and receives the hinges and latch; it transfers door weight into the wall framing, but it does not bear the building’s structural load. Door casing is the decorative trim installed on the wall surface around the frame. The jamb makes the door work, while the casing covers the rough gap between the frame and the drywall to provide a finished appearance.
How does a door frame differ from a door jamb?
A door frame is the complete assembly that encloses and supports a door opening, which includes side jambs, a head jamb, and often a sill or threshold. A door jamb is a single component of that frame, specifically one of the vertical sides or the top horizontal piece.
What is a door stop and what does it do?
A door stop is a raised strip of molding or a built-in step inside the door frame. The door slab rests against this stop when closed, which prevents the door from swinging through the opening and ensures proper latch alignment. It is different from a floor or wall doorstop, which is a bumper that protects the wall from the handle.
What is a door reveal in finish carpentry?
A door reveal is the small, intentional setback between the edge of the door jamb and the edge of the casing. Finish carpenters typically set the reveal at 1/8 에게 1/4 인치, ~와 함께 3/16 inch the common practical choice, to create a clean shadow line and hide minor alignment variations in the wall or frame.
Do aluminum doors require casing?
Not always. In many commercial and minimalist residential designs, the aluminum jamb installs flush with the wall or uses integrated snap-on trim profiles, which eliminate the need for traditional wood or metal casing.
최종 생각
Relying on vague terminology or unverified factory tolerances exposes commercial projects to costly on-site modifications and delayed shipments. Aligning your RFQs with precise jamb, 액자, and casing definitions is the most reliable way to protect your margins against installation failures and mismatched components. Getting these details right from day one keeps door operation consistent and protects your professional reputation.
Avoid expensive guesswork on material profiles and hardware clearances for your next bulk order. Requesting a product sample or sharing your project schedule lets you verify manufacturing precision before commitment. 엔지니어링 팀에 문의하세요 to review your RFQ line items and lock in your exact specifications.